Krita AI Diffusion & RunPod.io
Up to this point, I have aimed to explain various concepts and tools related to AI art without bias or preference. However, as we prepare to delve deeper into the topic, I'll have to focus on the tools and workflows I chose to suit my preferences and needs.
As I mentioned in my previous post, many ways exist to make AI art, and I can't recommend one as the best option because it depends on your goals and preferences. Some people might want to use AI to quickly generate simple images and share their ideas with minimal effort. Some may prefer AI to post-process their creations made with a 3D tool like Daz3D or Blender, while others may see AI as a complete replacement for traditional art-making tools.
My main goal was to use it as a tool to express my kinky ideas as accurately as I envision them, using a realistic style that is difficult to achieve with traditional methods. In this post, I will explain why I chose
Krita AI Diffusion, starting with a brief overview of other options.
Among the tools I mentioned earlier, custom image generators offered by various AI art websites are the easiest to use. They may be your best option despite their limited functionalities if you are only interested in quickly generating images by typing a few words into a prompt.
ComfyUI is at the other end of the spectrum. It's by far the most powerful yet complex tool we have now. Its node-based UI is very flexible, but it can feel daunting at times:

I recommend ComfyUI primarily for those who understand the inner workings of the AI image generation process and are interested in experimenting with their own workflows or automating them (e.g. batch process). ComfyUI is also necessary to try cutting-edge features that other tools may not yet support.
That said, ComfyUI has two interesting features that may make it worthwhile for those outside its primary audience. One is the ability to export workflows you made to a file and share them with others. Many online AI art sites, like
this one, provide a gallery from which you can browse and use such workflows. As such, you can use it as an alternative to custom online image generators because many allow you to use it simply by changing a few parameters like a model or prompt without having a deeper understanding of the process.
Another feature is its ability to serve as a backend to different GUIs, such as Krita AI Diffusion, which I use as my primary AI art tool.
Krita is a popular open-source painting tool that can also be used as an image editor like Photoshop. Krita AI Diffusion is an add-on that makes Krita a frontend (GUI) for ComfyUI.
The node-based workflow offered by ComfyUI is highly flexible, but it can be cumbersome for some tasks. While it excels at creating repeatable processes—such as taking a prompt, generating ten images, and then upscaling them—there are times when a layer-based workflow is much easier to use, like when you want to select an area and edit a part of it.
This is especially true if you are already familiar with traditional tools like Krita, GIMP or Photoshop and intend to adopt a workflow that resembles how you create a photo manipulation work. To edit a part of the image in ComfyUI, for example, you'd typically connect nodes like this:

It shows how you can "inpaint" a cat into an existing image in ComfyUI. And what if you like the cat's face but want to change its body? You'll need to add yet another set of nodes or change the input and mask by hand, which can be cumbersome with its web-based UI.
By the way, what steps would you take if you were to achieve it in a traditional photo manipulation work? First, you would find several images of a cat that match the perspective you want. Next, you would resize and crop the edges of these images. Afterwards, you would adjust the contrast, hue, saturation, and blurriness to match the background. Finally, you would copy and paste the head from one image onto the body of another. Right?
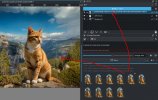
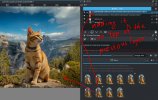
It's not fundamentally different when using Krita AI Diffusion, except that it's only much more effortless. You can simply select the area where you want to insert a cat, generate a batch of images, and then insert two of them as separate layers by double-clicking on them. After that, you can erase the head area of the top layer. This method eliminates the need for adding and connecting nodes or manually resizing and adjusting images. The final result looks far more realistic than you would typically achieve by copy-pasting a random photo onto another in a photo manipulation project (because you can't control things like the direction of light, in this case). For example,
1. Select the area to modify and generate a set of images using a prompt:

2. Choose an image suitable for the cat's head:

It will be automatically added as a layer when you dobuleclick on the thumbnail.
3. Choose an image for the cat's body:

It will be added as another layer on top of the previous one.
4. Erase the head part of the top layer to reveal the cat's head in the layer below:

Since Krita AI Diffusion is built on ComfyUI, you can use it directly for more advanced tasks. That's why I chose it as my primary tool for creating AI art, and I've used it to produce most of the images I've shared in my work thread.
Other tools like Forge or InvokeAI can also be great options, especially if you're unfamiliar with traditional image editing software. Additionally, not all online services offer ComfyUI or allow you to install the necessary models and custom nodes required by Krita AI Diffusion. These tools are among the most popular choices among dedicated AI image creators. You can't go wrong with them unless you prefer the convenience of a layer-based workflow, like I do.
Regarding the server option, I either run it locally on my PC with RTX4070TI (16GB) or use
RunPod.io. As I mentioned in my earlier post, RunPod is a cloud service that allows you to rent a GPU instance and network storage. Essentially, they provide you with a powerful PC that you can use for any task, including installing AI tools like ComfyUI or Forge.
One of the best benefits of using a cloud service like RunPod is the flexibility to use any tools or models you can download online. For example, I easily download and use models I find on Civitai, keep my ComfyUI installation always up to date, and rent a more powerful instance occasionally to handle resource-intensive tasks like video generation.
It may involve more steps and some basic knowledge of using Linux. It's not a problem for a Linux user like myself. Still, I think it shouldn't feel overly complex for ordinary Windows users either, considering you can use a "container template" that automates much of the process, and you'll only use the same few commands most of the time.
Next time, I will discuss various workflows I use to create my works in depth.
EDIT: One of the images was linked from another post, so I didn't break the forum rule, technically.


