-
Sign up or login, and you'll have full access to opportunities of forum.
You are using an out of date browser. It may not display this or other websites correctly.
You should upgrade or use an alternative browser.
You should upgrade or use an alternative browser.
Some of my work - by Anwendungsfehler
- Thread starter Anwendungsfehler
- Start date

Well... it ain't a chastity belt, for sure!Work-In-Progress
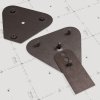
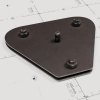
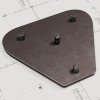
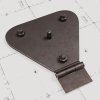
View attachment 1460015View attachment 1460016View attachment 1460017
Guess what this is guys^^ (still under construction)
Anwendungsfehler
Executioner
Really? Why?Well... it ain't a chastity belt, for sure!
Anwendungsfehler
Executioner
Just doesn't fit Tree's imagination... like these do...
View attachment 1460031View attachment 1460032View attachment 1460033
![2022-12-17-Calico-Shocked-shocked_high(c5).mp4_snapshot_42.00_[2024.03.07_21.23.42].jpg 2022-12-17-Calico-Shocked-shocked_high(c5).mp4_snapshot_42.00_[2024.03.07_21.23.42].jpg](https://www.cruxforums.com/xf/data/attachments/1457/1457828-5a789e0bc3002f30dec6ce289d3b2cb4.jpg)
![2016-03-22-Sister Dee-The Fly (BONUS)-sisterdee5_high.mp4_snapshot_26.50_[2024.03.29_00.24.30].jpg 2016-03-22-Sister Dee-The Fly (BONUS)-sisterdee5_high.mp4_snapshot_26.50_[2024.03.29_00.24.30].jpg](https://www.cruxforums.com/xf/data/attachments/1457/1457830-97d968871c1cb0b982d4014544006912.jpg)
Hihi.... it is a chastity belt
 however .. a bit ... darker...
Ohhh that looks great! With those latex hoods it looks like it’s not only orgasms you’ll control but even their very breath! Are those your slaves or are you just giving examples?View attachment 1460034View attachment 1460035View attachment 1460036
Hihi.... it is a chastity belthowever .. a bit ... darker...
It’s a very submissively erotic feeling to feel so controlled and under a dominant’s power even to control my breath! One feels incredibly vulnerable, each breath potentially my last if you choose to exercise your ultimate authority…. Mmmmm
Anwendungsfehler
Executioner
The girl in the first pic is Calico, in the second is Sister Dee, Dom is PD / Insex / Infernal Restraints. I love his work and devices, building the belt is some sort of fan project.Ohhh that looks great! With those latex hoods it looks like it’s not only orgasms you’ll control but even their very breath! Are those your slaves or are you just giving examplest?
It’s a very submissively erotic feeling to feel so controlled and under a dominant’s power even to control my breath! One feels incredibly vulnerable, each breath potentially my last if you choose to exercise your ultimate authority…. Mmmmm
This is one of many devices I will use in my upcoming renders.
Glenn Sander
Spectator
Inspiring torture.
Glenn Sander
Spectator
Excellent work!
Glenn Sander
Spectator
What an effort. Great!
I just adore her facial expression, a mix of resignation and fear.
Anwendungsfehler
Executioner
Constantly working to improve my skills and characters. Alongside Daz3D characters, I'm using Reallusion and Metahuman characters to gain more knowledge.
There was a problem with the last two character systems mentioned. No genitalia. I started creating some in October. Here is a result from last year.
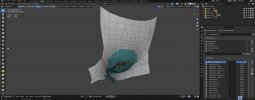
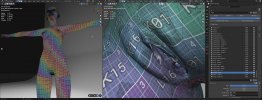
And a little video to see the result (hosted at my site) CC3_Gens
Music is licensed to me.
These parts are low poly. The high poly structure is sculpted in later as multires. This keeps my characters faster when it comes to animation.
I am working to create own characters from scratch for two years now. Nothing has shown yet, still much to learn.
There was a problem with the last two character systems mentioned. No genitalia. I started creating some in October. Here is a result from last year.


And a little video to see the result (hosted at my site)
 CC3_Gens
Music is licensed to me.
These parts are low poly. The high poly structure is sculpted in later as multires. This keeps my characters faster when it comes to animation.
I am working to create own characters from scratch for two years now. Nothing has shown yet, still much to learn.
Anwendungsfehler
Executioner
thanks!What an effort. Great!
Anwendungsfehler
Executioner
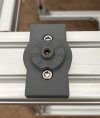
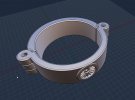
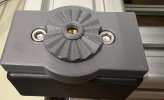
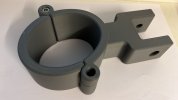
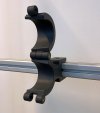
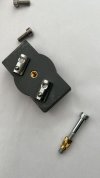
Real Life Stuff - I'm building a new rack system for some fun sessions with my wife
 - printed with my Prusa XL, material for the prototypes: Greentec Pro (Vicat 160°C),
final models are being printed with Greentec Pro Carbon. The parts are nearly unbreakable, and made-to measure - two sets, one for my wife, and one for me

- Switchers Paradise, haha! (why should J. have all the fun
Cadworks done in Plasticity

The whole rack will be shown after all parts are done...
Anwendungsfehler
Executioner
The carbon shackle is a beauty imo. The base adapter is made for 40 or 80mm alumnium profiles, I prefer the Item series.
The adapter plate allows several angles and is secured with a m6 stainless steel screw. I'll print the 2nd part this afternoon.
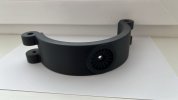
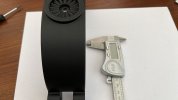
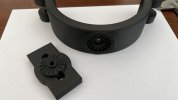
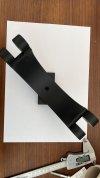
Material: Greentec Pro Carbon, 5x 0.4mm ObXidian Nozzles (coop between E3D and Prusa), layer height 0.2mm
The adapter plate allows several angles and is secured with a m6 stainless steel screw. I'll print the 2nd part this afternoon.


Material: Greentec Pro Carbon, 5x 0.4mm ObXidian Nozzles (coop between E3D and Prusa), layer height 0.2mm
Anwendungsfehler
Executioner
First thighcuff printed - pretty rigid 
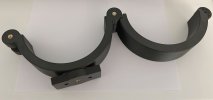
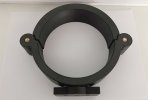
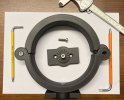
The finish is fine, very smooth and cozy to wear. J. gets a slightly modified version, so she can wear her Fernandos or catsuits as well, without damaging them
For both cuffs (45%infill) you will need one 800g spool of Greentec Pro carbon. Total print time with input shaper enabled is about one day. (2x Cuff Part A, 2X Cuff Part B and two adapters). I will post a BOM and cad files in my forum when everything is done.


The finish is fine, very smooth and cozy to wear. J. gets a slightly modified version, so she can wear her Fernandos or catsuits as well, without damaging them

For both cuffs (45%infill) you will need one 800g spool of Greentec Pro carbon. Total print time with input shaper enabled is about one day. (2x Cuff Part A, 2X Cuff Part B and two adapters). I will post a BOM and cad files in my forum when everything is done.
Anwendungsfehler
Executioner
Anwendungsfehler
Executioner
Ankle Cuffs Evolution 2
The "22.5° Angle Locking Concept" worked well, so I made some new ankle cuffs. Tis is the construction file I created in Plasticity.
Both ankle cuffs turned out well. The next time I print them, I will set the extrusion flow value from 1.00 to 0.98 to get a better surface on the top.
In this case I will do some sanding. Printed with Extrudr Greentec Carbon, 45% infill.
The concept is quite simple. You position both parts roughly as you would like the angle to be and then screw the two parts together with an M6 screw. Due to the shape, the two parts fit together exactly.
You will see them in some Blender scenes soon
Report Edit Delete
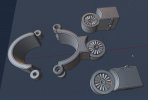
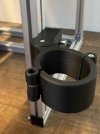
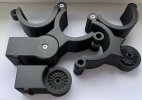
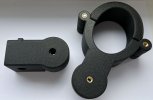
The "22.5° Angle Locking Concept" worked well, so I made some new ankle cuffs. Tis is the construction file I created in Plasticity.
Both ankle cuffs turned out well. The next time I print them, I will set the extrusion flow value from 1.00 to 0.98 to get a better surface on the top.
In this case I will do some sanding. Printed with Extrudr Greentec Carbon, 45% infill.
The concept is quite simple. You position both parts roughly as you would like the angle to be and then screw the two parts together with an M6 screw. Due to the shape, the two parts fit together exactly.
You will see them in some Blender scenes soon

Report Edit Delete


Anwendungsfehler
Executioner
Unfortunately, sometimes life doesn't turn out the way you thought it would - things you thought were important become relative. This also applies to loved ones who lose their grip on reality due to Alzheimer's or other diseases.
Today, for the first time in a long time, I started Blender again and reinstalled the Blender add-ons from scratch.
In between I also had some time to tidy up my old Daz3D installation a bit and lo and behold, some scenes load without any problems.

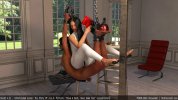

The last one is based on the old scene but I had some extra time, so I managed it to build some additional eye contact tension. I'm a bit rusty in Daz, so it took some time haha...
The next month I have to fulfill some promises I made this year, so stay tuned...
Today, for the first time in a long time, I started Blender again and reinstalled the Blender add-ons from scratch.
In between I also had some time to tidy up my old Daz3D installation a bit and lo and behold, some scenes load without any problems.


The last one is based on the old scene but I had some extra time, so I managed it to build some additional eye contact tension. I'm a bit rusty in Daz, so it took some time haha...
The next month I have to fulfill some promises I made this year, so stay tuned...
Last edited:


