
-
Sign up or login, and you'll have full access to opportunities of forum.
You are using an out of date browser. It may not display this or other websites correctly.
You should upgrade or use an alternative browser.
You should upgrade or use an alternative browser.
Teaching Old Dogs New Tricks
- Thread starter mermaidhunter
- Start date

mermaidhunter
Master Crucifixion Technician
Wow, Thanks for all the great pointers! I am trying one of them now as we speak, that being the Ez Skin...... it shows a lot of promise!
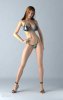
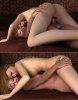
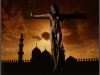
I have attached here a few eamples of some work that demonstrates the "realism" that I would like to achieve.
I have attached here a few eamples of some work that demonstrates the "realism" that I would like to achieve.
Attachments
For these effects you are on the right track with Ezskin. To get the soft light effect also use indirect light and 'diffuse screens'.
To experiment with those remove all lights from your scene, add a simple square or circle prop. Put it out of view of the camera and make it 'look' at your central , figure or prop. (if you use a simple stil life rather than a complete figure to tune the light your experiments take less time than when you use a figure. It is no use wasting render time in each iteration on shadows of hair or eye reflections. If you want to tune the scene light to your figure texture make hair invisible and pose with the back to the camera.)
Set the ambient channel of the prop material to a light color and set ambient value to a non-zero value like 1.0.
In the prop's properties panel enable ' light emitter'.
Render with indirect light enabled. You will have nice soft light but no highlights. For those add an odd spot- or pointlight. In the light 'material' crank up specular over diffuse if you just want the highlights and not the diffuse from the spot.
Remember that for good effect of indirect light the light needs objects to reflect against. So add backgrounds and surrounding objects. An environment sphere is a great help.
When you are satisfied save the empty scene. It probably took you a lot of time to make it and you may want to use it again. (BTW This would be a great opportunity to try the scene storage in the Poser 9 library. You have to save it as a scene because saving it as a light setting would leave out the diffuse screen).
mermaidhunter
Master Crucifixion Technician
For these effects you are on the right track with Ezskin. To get the soft light effect also use indirect light and 'diffuse screens'.
To experiment with those remove all lights from your scene, add a simple square or circle prop. Put it out of view of the camera and make it 'look' at your central , figure or prop. (if you use a simple stil life rather than a complete figure to tune the light your experiments take less time than when you use a figure. It is no use wasting render time in each iteration on shadows of hair or eye reflections. If you want to tune the scene light to your figure texture make hair invisible and pose with the back to the camera.)
Set the ambient channel of the prop material to a light color and set ambient value to a non-zero value like 1.0.
In the prop's properties panel enable ' light emitter'.
Render with indirect light enabled. You will have nice soft light but no highlights. For those add an odd spot- or pointlight. In the light 'material' crank up specular over diffuse if you just want the highlights and not the diffuse from the spot.
Remember that for good effect of indirect light the light needs objects to reflect against. So add backgrounds and surrounding objects. An environment sphere is a great help.
When you are satisfied save the empty scene. It probably took you a lot of time to make it and you may want to use it again. (BTW This would be a great opportunity to try the scene storage in the Poser 9 library. You have to save it as a scene because saving it as a light setting would leave out the diffuse screen).
Thanks so much for the advice I am trying to implement it as we speak.
T
The Fallen Angel
Guest
Wow, Thanks for all the great pointers! I am trying one of them now as we speak, that being the Ez Skin...... it shows a lot of promise!
I have attached here a few eamples of some work that demonstrates the "realism" that I would like to achieve.
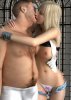
It is getting really difficult to tell real from computer. I would guess in the middle pic that the bloke is real and the girl is computer but I could not swear to it. Please!!..tell us which is real and which is false.
I agree. I really think the ad on the back cover of the U.S. Vanity Fairis a CGI... If it ain't they paid the model and the photogragher way too much to look like one...
Tree
Tree
mermaidhunter
Master Crucifixion Technician
It is getting really difficult to tell real from computer. I would guess in the middle pic that the bloke is real and the girl is computer but I could not swear to it. Please!!..tell us which is real and which is false.
I am pretty sure that they are both CGI ! That is why I want to achieve this capability.
I too like the possiblities, but computer graphics are still far short of the taste and smell of a woman, much less the touch of her flesh on my fingertips...I am pretty sure that they are both CGI ! That is why I want to achieve this capability.
tree
This Thread on RDNA has pointers to a course in light settings;
http://forum.runtimedna.com/showthread.php?70674-Lighting-amp-Rendering-in-Poser-Part-One
http://forum.runtimedna.com/showthread.php?70674-Lighting-amp-Rendering-in-Poser-Part-One
mermaidhunter
Master Crucifixion Technician
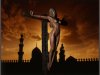
Well I have been following the tutorials, I am gaining ground. Poser 9 has so many more ...... functions and settings, it is a lot more powerful than I am. I was working most of the day with a stick figure learning lights and render settings. I got tires of stick figures and decided to try and see if I had leanrned anything that would actually make a render better. I think these are moving in teh right direction. I was tired and a little sloppy on the post work (blood trails), but I still like the way things are going. Thanks for the input everyone, and especially Bagoas.
Attachments
just one more pointer I that may be of interest: Bagginsbill's light meter
http://www.renderosity.com/mod/forumpro/showthread.php?thread_id=2798745&page=3#message_3627657
http://www.renderosity.com/mod/forumpro/showthread.php?thread_id=2798745&page=3#message_3627657
Marcie4you
Banned
You people, such talent! I'm left speechless!
All I can do is "hang"?
All I can do is "hang"?
Marcie4you
Banned
All I can do is lie there?")
By the way  ne of the items greatly improved in Poser 9/Pro 2012 is dynamic hair. The look and feel of the hair room have not changed, but the preview and render speeds have been much improved, so much that dynamic hair has become a workable feature. It no longer blocks your system while posing and render times have become very acceptable, even on older systems (>5 years) like mine.
See the thread at Rendo for some encouraging results (not from me, btw).
ne of the items greatly improved in Poser 9/Pro 2012 is dynamic hair. The look and feel of the hair room have not changed, but the preview and render speeds have been much improved, so much that dynamic hair has become a workable feature. It no longer blocks your system while posing and render times have become very acceptable, even on older systems (>5 years) like mine.See the thread at Rendo for some encouraging results (not from me, btw).
Marcie4you
Banned
I'm in TOTAL awe of all the great artists in this room!