You can posy them up to 400kbs...More stuff from Tensor.,art. I wish I could show you the full-sized originals, but it doesn't look like it's going to happen.
-
Sign up or login, and you'll have full access to opportunities of forum.
You are using an out of date browser. It may not display this or other websites correctly.
You should upgrade or use an alternative browser.
You should upgrade or use an alternative browser.
Images enhanced with AI
- Thread starter HBDancer
- Start date

Are you crazy? Of course she'll piss and shit when the current hits her. People pay good money to see her final humiliation.Are you serious?
You want to execute her completely naked on "Old Sparky", the electric chair?
Surely you're doing this for the first time, right? Hell, you'll be surprised what a mess and a stink it will be: the electric current creates extreme muscle contractions and pushes out everything that's in her bladder and bowels!

Plus the chair is wood and metal. After her execution it can be hosed off. Do you want the staff to go on strike because they had to clean (or dispose) of her soiled panties?!?!?!
thecuriousone
Governor
Hose off an ELECTRIC chair? Did you consider the risk of short circuit?Are you crazy? Of course she'll piss and shit when the current hits her. People pay good money to see her final humiliation.
View attachment 1491206
Plus the chair is wood and metal. After her execution it can be hosed off. Do you want the staff to go on strike because they had to clean (or dispose) of her soiled panties?!?!?!
Turn off the power supply, you fool!Hose off an ELECTRIC chair? Did you consider the risk of short circuit?

Faustling
Guard
They're all 300 and something.You can posy them up to 400kbs...
Faustling
Guard
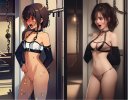
I am still learning things. Some of these images are so detailed, you can blow them way up from the regulation size.
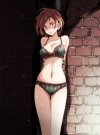
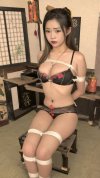
1. The model, reduced to 383K.
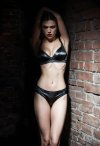
2. The finished AI image, reduced to 385K.
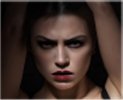
3. A cut out of the (reduced) face, blown up x4. (to 315K)
Kind of neat how that worked out!
1. The model, reduced to 383K.
2. The finished AI image, reduced to 385K.
3. A cut out of the (reduced) face, blown up x4. (to 315K)
Kind of neat how that worked out!
Attachments
fallenmystic
Tribune
I feel there could be a misunderstanding. If I'm not mistaken, the 400K limit is about the file size, not the image resolution(pixel count).I am still learning things. Some of these images are so detailed, you can blow them way up from the regulation size.
1. The model, reduced to 383K.
2. The finished AI image, reduced to 385K.
3. A cut out of the (reduced) face, blown up x4. (to 315K)
Kind of neat how that worked out!
I don't know what those numbers you mentioned are, but they don't appear to be either of the cases. Even if I take them as pixel counts, the last one is barely 114K, not 315K, as you said.
The 400Kb limit isn't much, but it shouldn't be that small. This is an actual 400Kb image file, for example:

The image resolution is 1785x1785, by the way.
fallenmystic
Tribune
At any rate, it means you don't have to post only tiny images.I am just measuring from the space the image takes in RAM, not from the pixels.
")
Faustling
Guard
Still learning. There seems to be no easy way of learning this. The tutorials are all out of date or rudimentary or else narrated by someone in a droning monotone that puts me to sleep. So I learn by doing, and after many failed experiments, I have picked up on a few things.
The easy way is . . . did I say there was no easy way? I did, but this is the best I have so far. Start by just cruising the Tensor.art and looking at all the pretty pictures, models and loras, and press the star in the upper right hand corner of those that particularly please you or you might want to use in the future. There are hundreds and hundreds of these, so don’t pick all of them, only the ones that stand out.
To start producing AI press “Create”. If you aren’t yet registered at the site, there will be some hoops to jump through. On the next screen, in the upper left corner, there will be an illuminated red button, “SD3 & DiD”. Don’t touch it, it just means you are producing things from text; we will discuss the other options some other time.
Further down on the left side, near the middle of the page, you will see the word “Models”. This is where you add your first model, which will set the pattern for the rest. By now, you should have some idea of what you want to produce. Remember all those pictures I told you to star? When you press the arrow, you will be presented with a choice of models arranged by category. On the far left side of the list, you will see a button, “My Starred”. Click there, and you will see all those pictures you just starred, or at least the ones that are suitable as models.
Here things get tricky. You need to stick to a consistent style. Some are realistic, and others look like cartoons or anime, and some have names like “mix” or “fusion”. Notice that to the lower left of each picture is a designation like “v1.0” or “v2” or number up to 16. These are different versions that may not be compatible with each other, so it is good to know which one you are working with. Combining incompatible versions can produce an awful mess, and you will be seeing many of these before you master the technique. Pick whichever one pleases you, and press “Select”. Or, if none of them is what you want, you can go back and sift through the different categories until you find something.
In this case, I picked “LoRaLover_XL -V2” to be my model. The picture looks a bit like what I was trying to create, so I figured I had a head start, and would not have to struggle against my own model. XL means extra large, and I assumed that it would be easier to accommodate a small format in an extra large one, rather than the other way around. V2 is not the top nor the most popular format, which would be V1, but I thought it would be close enough that compatibility wouldn’t be a big problem.
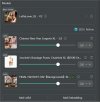
Now that you have your base model, go down a bit and press the button that says "Add LoRA". This brings you back to the picture categories. Press “My Starred” and you will have a choice of things you can add. IMPORTANT: So long as you are in “My Starred”, you will be blocked if you try to choose an incompatible lora. But if you don’t find what you need there, you will have to choose another category, with no guarantee that anything there will be compatible.
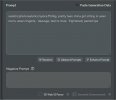
In this case, I chose three loras: one each for clothing, position and background. I could have added a lot more, but the more things you add, the harder it will be to fit them to your composition and the greater the chance of incompatibilities. Above your loras, is a box, “Prompt” where you can right a short text description of what you want. You may notice there is already some text written there, provided by the loras themselves, and you shouldn’t change that in any way. Below “Prompt” is “Negative Prompt”. I rarely write anything there. Some people cram it with things like “ugly” or “low quality”, but I don’t think it makes much difference.
Once you have the loras you need, press the big green button that says “Generate”. Depending on your priority and how many people are using the server, it may take a long time or a very long time to get your AI image. You can speed things up by choosing “1” in the box next to the green button, which means that only one image will be generated, but your chances of getting what you want on the first attempt are low, so I usually choose “4”. (NOTE: If you have exceeded your quota of images, they won’t tell you that, they will just leave you to looking at a screen that says “Waiting” until you give up and go to bed.)
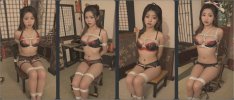
OK, now you have 4 images. You can simply click one, download it and you’re done. But wait! Why does she have three legs??? It is not unlikely that ALL your initial pictures will be flawed in some way, which means you will have to try again. The simplest kind of problem to fix is when some detail in a lora fails to show up or is indistinct. Your brilliant AI bot is only a machine, after all, and it had a lot of balls to juggle, and it didn’t give that one enough priority. Look at the listed loras. Each has a slider to the right, which you can adjust to give that lora more or less prominence in the next attempt.
Or you may find that two of your loras are incompatible for some reason. Take one out and start over. BUT be careful, if you keep changing things, the cumulative changes may pile up and turn into something really monstrous, and if that happens, the best solution is to delete everything and work on something else for awhile.
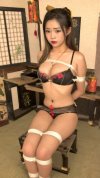
As you can see, in this case, I got three pretty good pictures and one worth uploading. That’s what I consider an optimum result, but it doesn’t happen every time.
The easy way is . . . did I say there was no easy way? I did, but this is the best I have so far. Start by just cruising the Tensor.art and looking at all the pretty pictures, models and loras, and press the star in the upper right hand corner of those that particularly please you or you might want to use in the future. There are hundreds and hundreds of these, so don’t pick all of them, only the ones that stand out.
To start producing AI press “Create”. If you aren’t yet registered at the site, there will be some hoops to jump through. On the next screen, in the upper left corner, there will be an illuminated red button, “SD3 & DiD”. Don’t touch it, it just means you are producing things from text; we will discuss the other options some other time.
Further down on the left side, near the middle of the page, you will see the word “Models”. This is where you add your first model, which will set the pattern for the rest. By now, you should have some idea of what you want to produce. Remember all those pictures I told you to star? When you press the arrow, you will be presented with a choice of models arranged by category. On the far left side of the list, you will see a button, “My Starred”. Click there, and you will see all those pictures you just starred, or at least the ones that are suitable as models.
Here things get tricky. You need to stick to a consistent style. Some are realistic, and others look like cartoons or anime, and some have names like “mix” or “fusion”. Notice that to the lower left of each picture is a designation like “v1.0” or “v2” or number up to 16. These are different versions that may not be compatible with each other, so it is good to know which one you are working with. Combining incompatible versions can produce an awful mess, and you will be seeing many of these before you master the technique. Pick whichever one pleases you, and press “Select”. Or, if none of them is what you want, you can go back and sift through the different categories until you find something.
In this case, I picked “LoRaLover_XL -V2” to be my model. The picture looks a bit like what I was trying to create, so I figured I had a head start, and would not have to struggle against my own model. XL means extra large, and I assumed that it would be easier to accommodate a small format in an extra large one, rather than the other way around. V2 is not the top nor the most popular format, which would be V1, but I thought it would be close enough that compatibility wouldn’t be a big problem.
Now that you have your base model, go down a bit and press the button that says "Add LoRA". This brings you back to the picture categories. Press “My Starred” and you will have a choice of things you can add. IMPORTANT: So long as you are in “My Starred”, you will be blocked if you try to choose an incompatible lora. But if you don’t find what you need there, you will have to choose another category, with no guarantee that anything there will be compatible.
In this case, I chose three loras: one each for clothing, position and background. I could have added a lot more, but the more things you add, the harder it will be to fit them to your composition and the greater the chance of incompatibilities. Above your loras, is a box, “Prompt” where you can right a short text description of what you want. You may notice there is already some text written there, provided by the loras themselves, and you shouldn’t change that in any way. Below “Prompt” is “Negative Prompt”. I rarely write anything there. Some people cram it with things like “ugly” or “low quality”, but I don’t think it makes much difference.
Once you have the loras you need, press the big green button that says “Generate”. Depending on your priority and how many people are using the server, it may take a long time or a very long time to get your AI image. You can speed things up by choosing “1” in the box next to the green button, which means that only one image will be generated, but your chances of getting what you want on the first attempt are low, so I usually choose “4”. (NOTE: If you have exceeded your quota of images, they won’t tell you that, they will just leave you to looking at a screen that says “Waiting” until you give up and go to bed.)
OK, now you have 4 images. You can simply click one, download it and you’re done. But wait! Why does she have three legs??? It is not unlikely that ALL your initial pictures will be flawed in some way, which means you will have to try again. The simplest kind of problem to fix is when some detail in a lora fails to show up or is indistinct. Your brilliant AI bot is only a machine, after all, and it had a lot of balls to juggle, and it didn’t give that one enough priority. Look at the listed loras. Each has a slider to the right, which you can adjust to give that lora more or less prominence in the next attempt.
Or you may find that two of your loras are incompatible for some reason. Take one out and start over. BUT be careful, if you keep changing things, the cumulative changes may pile up and turn into something really monstrous, and if that happens, the best solution is to delete everything and work on something else for awhile.
As you can see, in this case, I got three pretty good pictures and one worth uploading. That’s what I consider an optimum result, but it doesn’t happen every time.
Attachments
We're going on the 44.6, so you are well within the limitOK, this is really confusing. Mei Ling (the girl on the right) is 623KB in memory, but 50KB on my disk. According to the information here, she is 44.6KB. Which, if any, of these should I rely on?
I read 44.6Kb. Definitely no problem with that.OK, this is really confusing. Mei Ling (the girl on the right) is 623KB in memory, but 50KB on my disk. According to the information here, she is 44.6KB. Which, if any, of these should I rely on?
Where is she so large in memory? Is it in something like Photoshop? Photoshop samples the original image, which might be quite large. Your AI program may do the same. But the image will be compressed and reduced when converting to Jpeg. That's why we ask people to post jpg images and not the original image format you use when you're working on the image.
Faustling
Guard
As I said before, in the upper left-hand corner of the Tensor.art creation page is a little button that says, “SD3 & DiD”. Which means that you are converting text to art. That’s basically true, though you are using preset models as aids.
To the right of that is another button that says “Img2Img”. As you might expect, this means that you are converting one piece of art into something else. You should probably think twice about doing that, because you are messing with someone else’s work. At a minimum, you should never claim his work as your own and should credit him where possible.
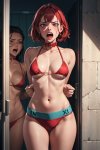
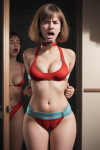
For purposes of this exercise, I chose a piece of hentai that is great hentai. I don’t know the name of the author. I wanted to see how it would look in a more realistic style, which I did with the model Epic Realism and this prompt: “photorealistic, ,bound arms, pretty teen girls in tight swimsuits, hands behind backs,, cleavage, struggling, angry, mouths open”. I wouldn’t necessarily claim that the resulting image is better, but it is different, and some people will prefer it.
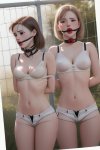
I’m not sure where the second example came from, but I didn’t like it much. Those girls are just too young, too sullen and too unappealing. Away with this poor-quality kiddie porn! I zapped it with GrayColorCuteMix - 1.0 and this prompt: “bound arms,ball gag,Breasts, two cute white teen girls wearing tight white shorts, cleavage, gagged, hands behind backs, anxious, looking at each other”. The result is obviously much better.
(The AI sometime will generate kiddie porn when you didn’t want and didn’t expect it to. In such a case, remove words like “young” and “petite” from the prompt and add words like “tall” and “cleavage”. Children are not tall, and do not have cleavage, I would maintain.)
To the right of that is another button that says “Img2Img”. As you might expect, this means that you are converting one piece of art into something else. You should probably think twice about doing that, because you are messing with someone else’s work. At a minimum, you should never claim his work as your own and should credit him where possible.
For purposes of this exercise, I chose a piece of hentai that is great hentai. I don’t know the name of the author. I wanted to see how it would look in a more realistic style, which I did with the model Epic Realism and this prompt: “photorealistic, ,bound arms, pretty teen girls in tight swimsuits, hands behind backs,, cleavage, struggling, angry, mouths open”. I wouldn’t necessarily claim that the resulting image is better, but it is different, and some people will prefer it.
I’m not sure where the second example came from, but I didn’t like it much. Those girls are just too young, too sullen and too unappealing. Away with this poor-quality kiddie porn! I zapped it with GrayColorCuteMix - 1.0 and this prompt: “bound arms,ball gag,Breasts, two cute white teen girls wearing tight white shorts, cleavage, gagged, hands behind backs, anxious, looking at each other”. The result is obviously much better.
(The AI sometime will generate kiddie porn when you didn’t want and didn’t expect it to. In such a case, remove words like “young” and “petite” from the prompt and add words like “tall” and “cleavage”. Children are not tall, and do not have cleavage, I would maintain.)
Attachments
fallenmystic
Tribune
With SD1.5 or SDXL, you won't get very far without inpainting and control nets. But if you're restricted to using just prompts for some reason (e.g. the service you use doesn't offer more advanced tools), I'd recommend switching to a Pony variant checkpoint.
From what I've tried so far, the prompt-following ability of Pony models is vastly superior to that of others. So, it'd help a lot if you had to do everything by prompting alone.
I haven't used Tensor Art, but they seem to provide some Pony models.
Note that Pony models expect special tags in a prompt, by the way. So, you may want to learn how to prompt a Pony model before testing it.


Faustling
Guard
I concentrate on Tensor.art because it is easy to use and has bountiful resources and no NSFW restrictions. You can achieve some beautiful results with Tensor.art, and I do love beautiful things.
I freely admit that it isn’t so good for torture. There aren’t a lot of sites that are. Pixai.art had some good loras, but then it went non-NSFW. You can still access them if you log in through Discord, but then they only work with the anime style.
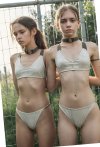
If you wanted good torture art, you could do something on Pixai.art and then clean it up with Tensor.art Img2Img. (The one on the left is Pixai, and the one on the right has been cleaned up in Tensor.) Of course, you would be paying for both sites, but if you have any experience with Tensor, doing things in Pixai wouldn’t be too hard.
I am only talking about basic procedures here, because that is where everyone starts, and if you have any tips or advice on advanced techniques, feel free to share it. I am still quite far from being an expert.
I freely admit that it isn’t so good for torture. There aren’t a lot of sites that are. Pixai.art had some good loras, but then it went non-NSFW. You can still access them if you log in through Discord, but then they only work with the anime style.
If you wanted good torture art, you could do something on Pixai.art and then clean it up with Tensor.art Img2Img. (The one on the left is Pixai, and the one on the right has been cleaned up in Tensor.) Of course, you would be paying for both sites, but if you have any experience with Tensor, doing things in Pixai wouldn’t be too hard.
I am only talking about basic procedures here, because that is where everyone starts, and if you have any tips or advice on advanced techniques, feel free to share it. I am still quite far from being an expert.